Today I:
changed the nutrient solution in the lettuce machine
moved the unheated propagator to the kitchen windowsill as the lettuce seeds had sprouted and hooked up one of the propagation lights over it and the trough of stir fry leaves.
Took some photos for the start of my grand tour. My first post was probably rather cryptic for anyone who wasn’t me, but I just wanted to get it down and start. Now I will go round my various little projects and introduce them properly.
Beginning with – ta dah! My bean sprouts. First, a definition. An ‘unvention’ is defined by a wonderful knitter called Elizabeth Zimmerman as one of those brilliant original ideas you have which it turns out has been thought of before – probably many times by different people, all as pleased as you were to be visited by such brilliance. So it isn’t surprising that since I ‘unvented’ the perfect way to sprout bean sprouts, I have discovered that Joy Larkcom describes something very similar in her Organic Salads book, and a company is actually selling a sprouter made in basically the same way as mine, but a bit more elaborate – http://www.sproutpeople.com/devices/ez/easysprout.html . The unventor of that one claims it came to him in a dream, which upstages me a bit, but never mind. Mine works and is cheaper – even free if you already have the bits.
When I decided to try growing bean sprouts I had bad memories of previous times I had tried it from studenthood on. They were generally nothing like the nice long straight crunchy sprouts you can buy even in Tesco these days. They were skinny little twisty rooty things that often went a bit manky and brown before they reached anything like the right size. So I did what any sensible person would do and googled – and found lots of sites where people were complaining that their bean sprouts were skinny little twisty rooty things that often went a bit manky and brown, and lots of ‘expert’ sites which said cop-out things like ‘don’t expect your bean sprouts to look like those boring long white crunchy commercial ones; they are much nicer like this and if you eat them when they are just a few days old they won’t even go manky and brown.’
Well, pah. If a Chinese peasant can grow them, it can’t demand anything too technological. I read up on some commercial sprouting machinery to find out what they did, which is grow in huge vats which are watered every four hours. And I tried to find out what Chinese peasants did, which is grow them in a bucket with a stone on top. The secrets turned out to be:
Rinse from the top and drain from the bottom so that the orientation of the seeds is not disturbed. This is what makes the sprouts go straight and long. If you use a method that keeps mixing them up every time you wash and drain, they have to keep twisting to try and grow root down and shoot up like a good seed should.
Never let water pool even a little bit. That’s what stops them going brown and manky, and that’s what lets you grow them for long enough to get a decent size.
Grow them under a weight. That’s what makes them grow fat and crunchy – they need to be thick and strong to push their way up against the weight.
As you can see, the old ‘jar with cheesecloth over the mouth’ method fails on all three counts.
My unvention requires three plastic containers that nest into one another in such a way that there is always a bit of space at the bottom between each one. Only one lid is needed. The first one I made used three plastic shaker bottles I already had in the cupboard. The second one used plastic tubs from Lakeland. Both work well.


Drill holes (smaller than a mung bean) in the bottom of one container. That’s all you have to do.
Soak the beans for at least 8 hours and drain. Put them in the perforated container and put that in one of the other containers. Then put water in the third container (about half full works with mine) and put the lid on it. Put this into the container with the beans so that it presses down on them. Put it somewhere warm and darkish.
At least twice a day, remove the middle container with the beans and rinse gently through, without disturbing their position. You can use a tap spray attachment or a watering can with rose or just a gentle trickle. After a few days, they become more jammed together and it gets easier. Pour out any drained water from the bottom container and rinse it out. Reassemble the three tiers.
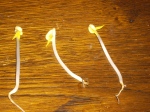
Keep on repeating until the sprouts are long enough, which should be round about the same time they start to show tiny yellow leaflets. I usually remove or reduce the weight for the last couple of days, which seems to help them make a final spurt of length. By about a week, they will be almost filling the container, probably, and will be quite hard to pull out.
To get rid of the skins, you ideally need some kind of strainer with quite big holes to let the skins fall through. I got mine in a garden centre. Tip or pull them out and separate them into the strainer. Rise under the tap quite vigorously and most of the skins should dislodge. Do it over a bowl so that you can retrieve any sprouts that fall through too. The skins don’t do any harm and don’t taste unpleasant, but they don’t enhance things either, so if we are going for perfection, let’s get rid of as many as we can.
You can see from the later pictres how the beans that only just covered the base of the container when dry are pushing the upper container almost off by the end. After the weight is removed they really shoot up.
And that’s it – perfect bean sprouts. Pah.

Hi, I like your unvention, how easy once you have the right technique!
I love sprouts but, like you, could never get them to grow without a manky smell. I am definitely going to give your method a go. Thanks.
hello,
I don’t quite get the illustration. So is it:
container #1, top: with water
container #2, middle: with holes and beans
container #3, bottom: empty
correct?
Love your ‘unvention’ and the phrase you have coined. What if the space between the containers when they nest is too large to hold the beans in place at first? It looks like your first set-up had a pretty large space too. Is that why you switched to one where they nested more closely? The gap between my containers looks like the beans will move around and let the sprouts get twisty until they are a few days old. Any suggestions or recommendations?
i use a machine with 6 trays . first i wash the beans then i soak them for 5 hours 3rd i put then in the trays and i pput the machine on and every 2 hours the machine spray water on the trays whish are stack on top of the other. after four days i harvest them . my problem is that they turn brown after at least two hours afer putting into the container. why do they turn brown . any ideas
I’m not sure I am imagining it right but maybe every two hours is too often? If they are kept wet all the time or if the water can’t drain off well then they go brown.